Writing rules scripts
This guide will cover the ins and outs of writing approval rules for Fensak, including an overview of the rules engine, language support, available functions that you can use in your rules funtions, and testing.
The rules engine
At the heart of Fensak is reng, the approval rules engine. The approval rules engine is powered with a hermetic JavaScript interpreter (NeilFraser/JS-Interpreter, trusted and used by many including Google for secure JS runtimes in JS). The JS interpreter provides a secure isolated runtime for us to execute arbitrary user defined code, with stronger sandboxing guarantees than plain JS sandboxing or isolates. Naturally, this security introduces limits on the rule functions that make certain kinds of operations impossible.
In general, you have full access to all the computational aspects of JavaScript, including regular expressions. In other words, anything that requires access to the outside environment (such as network, file system, subprocesses, etc) will not be made available to your function.
If you want to know whether a specific function is available in the runtime or not, import the
runRule from fensak-io/reng and give it a
try.
Refer to the Testing your rule functions section for setting up a test environment to experiment with different rule implementations.
What languages are supported
The core rules engine only supports code written in JavaScript (and more specifically, ECMAScript 5.1 aka ES5). In addition, Fensak includes built-in support to compile ECMAScript 6 (aka ES6) and TypeScript, allowing your rules to be implemented directly in those languages without a separate compile step.
If you wish to write your rules in another language that can be compiled down to ES5 (e.g.,
ReScript), you must precompile your code down to ES5 and check the compiled version in the
.fensak repository (see the with-dependencies
example).
In summary, the following languages are natively supported by Fensak without explicit compilation:
- JavaScript ECMAScript 5.1
- JavaScript ECMAScript 6
- TypeScript
The rule function
Fensak rules are implemented as a single JavaScript function (must be named main) that takes in a list of IPatch
objects with an IChangeSetMetadata object (see
fensak-io/reng/src/engine/patch_types.ts) and
returns a boolean indicating whether the change set should be approved. The function signature is as follows:
function main(inp: IPatch[], metadata: IChangeSetMetadata): boolean
IMPORTANT
The rules engine expects to see the
mainfunction named as such. If you are compiling your code, make sure any minifying routine avoids mangling themainfunction name.
At runtime, the rules engine will call this function with the corresponding IPatch[] and IChangeSetMetadata objects
generated from the PR change set, and then act based on the result of the returned boolean.
Note that you should not export the main function in your code. This is because the engine does not support modules,
and thus is unable to handle exports.
This also means that the engine is unable to support import as well. If you wish to separate out your rules file into
modules, or want to rely on external dependencies, you will need to use a package bundler that will be able to package
all the necessary dependencies into a single ES5 file with the main function. We won’t cover how to do this as it is
outside the scope of Fensak, but there are many tutorials that guide through configuring bundlers like RollUp and
Webpack to output a single file.
The one exception is type imports in TypeScript. Type annotations are stripped by the Fensak engine at compile time
before feeding to the JS interpreter. The Fensak engine doesn’t enforce types of submitted code, but you can
still use types to check your code in development and testing. To make this work, you can surround your type imports
with the keywords fensak remove-start and fensak remove-end. Fensak will strip the code of everything inbetween
these tags before feeding through the engine so that the engine doesn’t complain about the import keyword.
Here is an example of importing the IPatch, IChangeSetMetadata and ILineDiff types so that you can typecheck your
access to the attributes of the inp object:
Deno
// fensak remove-start
import type {
  IChangeSetMetadata,
  ILineDiff,
  IPatch,
} from "npm:@fensak-io/reng@^2.0.0";
// fensak remove-end
TypeScript (NodeJS)
// fensak remove-start
import type {
  IChangeSetMetadata,
  ILineDiff,
  IPatch,
} from "@fensak-io/reng";
// fensak remove-end
To close this section out, here is the code for the sample.ts file in the .fensak template repository:
/**
 * This is a Fensak rule that allows any Pull Request that only has changes to
 * the root README.md file.
 */

// fensak remove-start
import type {
  IChangeSetMetadata,
  IPatch,
} from "npm:@fensak-io/reng@^2.0.0";
// fensak remove-end

// deno-lint-ignore no-unused-vars
function main(inp: IPatch[], _metadata: IChangeSetMetadata): boolean {
  const numPatches = inp.length;
  if (numPatches == 0) {
    // No files updated, so approve.
    console.log("Accepting since no changes.");
    return true;
  } else if (numPatches > 1) {
    // More than one file was updated, which means not just the README.md was changed so reject.
    console.log("Rejecting since more than one file was updated.");
    return false;
  }

  const patch = inp[0];
  return patch.path === "README.md"
}
Refer to the fensak-io/fensak-rules-examples repository for more examples of rules files.
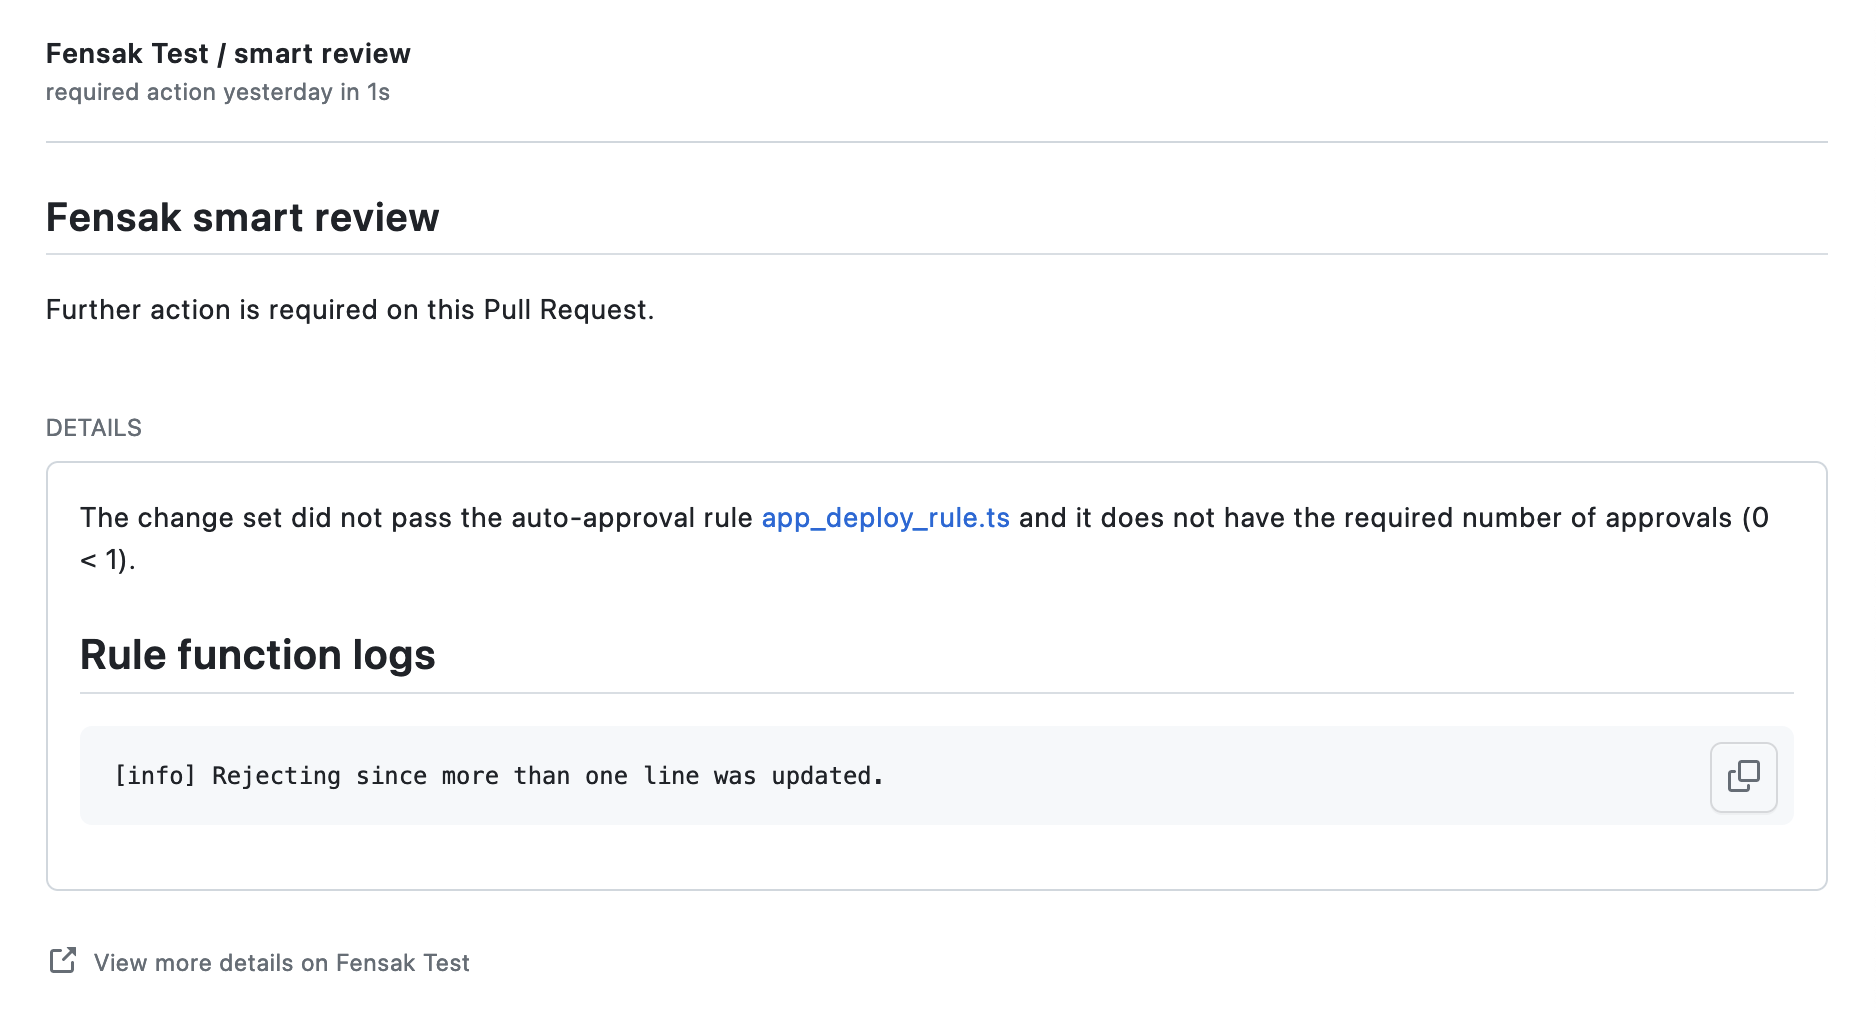
Console logging
You can use console.log and related functions (e.g., console.warn, console.error, console.debug) to emit debug
logs from the rule function. A modified version that captures the console output to memory is made available to the
rules environment by the engine. The engine uses this to collect all logs emitted during rule execution, and send them
to the output details for the GitHub check that is created on the PR after the rule is run.
Here is an example of what that looks like:
Testing your rule functions
Fensak is makes the source code behind the rules engine publicly available under a dual license. This means that you can use the same code that executes the rules functions to test your code, giving you full confidence that the functions will behave in the same way in dev/test and in production.
NOTE
Refer to our License FAQ section for more details on the dual license, and which one to use when.
The core rules engine (reng) is available as an npm package under @fensak-io/reng. The library offers helper functions for compiling and running the rules, and is the same code that is used by the Fensak service. This means that you can import this into your test cases to run your rules under the same engine as the Fensak service, allowing you to see how the rules will behave on the platform itself.
You can use any JavaScript runtime and framework that supports npm to write your tests. Here we offer two popular runtimes and frameworks you can use:
Writing tests for your rules using Deno
You can use standard Deno conventions for testing your rules code. Start by creating a file named
<RULE_FILENAME>_test.ts. For example, if your rule is in the file rule.ts, the test file should be named
rule_test.ts.
In your test file, start with some boilerplate code to load the rule into the test context:
import {
  compileRuleFn,

  // NOTE: other imports are used later
  LineOp,
  PatchOp,
  RuleLogMode,
  runRule,
  emptyChangeSetMetadata,
} from "npm:@fensak-io/reng@^1.3.0";

const __dirname = new URL(".", import.meta.url).pathname;
const rawRuleFn = await Deno.readTextFile(`${__dirname}/rules.ts`);
const ruleFn = compileRuleFn(rawRuleFn, RuleFnSourceLang.Typescript);
This code:
- Finds the path to the directory where the test file is located and binds it to
__dirname. This is necessary because all relative paths in Deno are relative to the CWD, and that changes depending on where you randeno. - Uses the
__dirnameto create a stable path to the rule source file. In this case the rule source is in TypeScript, but the rule source can be anything that the engine supports. Only the test code needs to be in TypeScript and Deno. - Compiles the TypeScript based raw rule function down to ES5 using the
compileRuleFnfunction offered by Fensak.
Once you have the rule, you can start testing the rule function behavior in the Fensak engine. You can import the
runRule function, and then evaluate the results against a bunch of patch data.
For example, here is a sample test that creates a mock patch containing a change to the README file:
// ... other code omitted for brevity ...

import { assert } from "https://deno.land/[email protected]/testing/asserts.ts";

Deno.test("rule rejects change to README file", async () => {
  // A fake patch with a hunk updating the title of the README.md file from "Fensak Docs" to "Fensak Documentation".
  const readmePatch = {
    contentsID: "asdf-1234",
    path: "README.md",
    op: PatchOp.Modified,
    additions: 1,
    deletions: 0,
    diff: [{
      originalStart: 1,
      originalLength: 1,
      updatedStart: 1,
      updatedLength: 1,
      diffOperations: [{
        op: LineOp.Modified,
        text: "# Fensak Docs",
        newText: "# Fensak Documentation",
      }],
    }],
  };

  const result = await runRule(ruleFn, [readmePatch], emptyChangeSetMetadata, {
    // Output console calls to stderr
    { logMode: RuleLogMode.Console },
  });
  assert(!result.approve);
});
In this test, we run the rule through a mock patch that we create by hand and check the results to verify that the patch was rejected.
Generating these patch objects can be verbose and tedious, so you can also use the GitHub related functions to pull a patch from an actual pull request, like so:
// ... other code omitted for brevity ...

import { Octokit } from "npm:@octokit/rest@^20.0.0";

Deno.test("rule rejects test PR 1", async () => {
  const patches = await patchFromGitHubPullRequest(octokit, {
    owner: "fensak-io",
    name: "test-fensak-rules-engine",
  }, 1);
  const result = await runRule(ruleFn, patches.patchList, patches.metadata, { logMode: RuleLogMode.Console });
  assert(!result.approve);
})
Once you have these test functions written, you can run them with deno test. Note that you need to allow certain
environment access as required by the engine. The following flags should allow you to run the tests:
deno test --allow-env --allow-read --allow-net
Writing tests for your rules using Jest
Since @fensak-io/reng is an ordinary npm package, we can use any JavaScript testing framework to write our rules
tests. Here we show an example of using jest but any will do.
We will be writing our tests for jest using TypeScript, so we need to start by configuring our project with a few
configuration files.
At a minimum, you will need:
package.jsonfile to specify dependencies.tsconfig.jsonfile to specify compiler options for TypeScript.jest.config.cjsfile to specify configurations forjest, namely to compile TypeScript.
Check out the json-config-test example
in the fensak-io/fensak-rules-examples repository for an example of each of these files.
TIP
We recommending using a linter and code formatter, such as eslint and prettier. Our
json-config-jestexample in has an example of setting these tools up alongsidejestfor testing.
Once you have all the tools, you can start writing your test. Start by creating a file named <RULE_FILENAME>.test.ts.
For example, if your rule is in the file rule.ts, the test file should be named rule.test.ts.
In your test file, start with some boilerplate code to load the rule into the test context:
import fs from "node:fs";

import {
  compileRuleFn,

  // NOTE: other imports are used later
  LineOp,
  PatchOp,
  RuleLogMode,
  runRule,
  emptyChangeSetMetadata,
} from "@fensak-io/reng";

const ruleFnSrc = fs.readFileSync(`${__dirname}/rules.ts`, "utf8");
const ruleFn = compileRuleFn(ruleFnSrc, RuleFnSourceLang.Typescript);
This code:
- Uses the
__dirnamekeyword for node to create a stable path to the rule source file. In this case the rule source is in TypeScript, but the rule source can be anything that the engine supports. - Compiles the TypeScript based raw rule function down to ES5 using the
compileRuleFnfunction offered by Fensak.
Once you have the rule, you can start testing the rule function behavior in the Fensak engine. You can import the
runRule function, and then evaluate the results against a bunch of patch data.
For example, here is a sample test that creates a mock patch containing a change to the README file:
// ... other code omitted for brevity ...

import { expect, test } from "@jest/globals";

test("rule rejects change to README file", async () => {
  // A fake patch with a hunk updating the title of the README.md file from "Fensak Docs" to "Fensak Documentation".
  const readmePatch = {
    contentsID: "asdf-1234",
    path: "README.md",
    op: PatchOp.Modified,
    additions: 1,
    deletions: 0,
    diff: [{
      originalStart: 1,
      originalLength: 1,
      updatedStart: 1,
      updatedLength: 1,
      diffOperations: [{
        op: LineOp.Modified,
        text: "# Fensak Docs",
        newText: "# Fensak Documentation",
      }],
    }],
  };

  const result = await runRule(ruleFn, [readmePatch], emptyChangeSetMetadata, {
    // Output console calls to stderr
    { logMode: RuleLogMode.Console },
  });
  expect(result.approve).toBe(false);
});
In this test, we run the rule through a mock patch that we create by hand and check the results to verify that the patch was rejected.
Generating these patch objects can be verbose and tedious, so you can also use the GitHub related functions to pull a patch from an actual pull request, like so:
// ... other code omitted for brevity ...

import { Octokit } from "@octokit/rest";

test("rule rejects test PR 1", async () => {
  const patches = await patchFromGitHubPullRequest(octokit, {
    owner: "fensak-io",
    name: "test-fensak-rules-engine",
  }, 1);
  const result = await runRule(ruleFn, patches.patchList, patches.metadata, { logMode: RuleLogMode.Console });
  expect(result.approve).toBe(false);
})
Once you have these test functions written, you can run them with jest:
npx jest