Getting started with BitBucket
In this section we cover subscribing to Fensak, installing the Fensak BitBucket Add-on, and the steps needed to get started protecting your GitOps branches with support for Continuous Delivery.
Tip
If you wish to try out the Fensak rules engine before subscribing, you can do so by using the rules engine locally. Refer to our Writing rules guide for more information.
Subscribe to Fensak and install the Fensak BitBucket Add-on
Our hosted Fensak service requires an active subscription plan to start monitoring your pull requests. You can start a free trial for Fensak through our dashboard service.
Our dashboard allows you to manage your subscription, including assinging multiple BitBucket Workspaces to an existing Pro subscription.
NOTE
Fensak does not offer a free plan beyond the free trial. A Base or Pro tier paid subscription listed on the pricing page is required for continuous access.
Once you subscribe, the dashboard will redirect you to BitBucket so that you can install the BitBucket Add-on in your Workspace.
With the add-on installed, you are ready to get started using Fensak!
Let’s define our first rule and link it to a repository.
Create a .fensak repository in your BitBucket Workspace
All Fensak configuration is managed through a special repository in BitBucket Workspace: the .fensak repository.
This repository should contain your auto-approval rules and the mapping configuration for which rules apply to which
repos.
To make it easy to get started, we offer template repositories that contain everything needed to configure the .fensak
repo. We recommend creating the .fensak repository in your Workspace by using the template repo.
You can do this by following these steps:
-
Create a new empty repository on BitBucket.
- Name the repository
.fensak. - Select
NoforInclude a README?andInclude .gitignore?.
- Name the repository
-
Clone one of the template repositories. Here are the template repositories that we currently have available:
- fensak-io/dotfensak-deno-template: TypeScript based rules and tests, using Deno as the testing/linting runtime.
- fensak-io/dotfensak-jest-template: JavaScript based rules and tests, using Node with Jest as the testing runtime, and ESLint + Prettier as the linting runtime.
- fensak-io/dotfensak-ts-jest-template: TypeScript based rules and tests, using Node with Jest as the testing runtime, and ESLint + Prettier as the linting runtime.
-
Update the remote URL for
originto the repository you created in step 1:git remote set-url origin [email protected]:<YOUR_WORKSPACE>/.fensak.git
-
Remove the following files:
LICENSESECURITY.md
-
Add, commit, and push the changes (
git push origin main).
Once the repository is created, feel free to take a look at what’s included. The template repository contains, amongst other things:
- A sample rule script that allows any changes that only modify the
README.mdfile in the root of the repo. - Test framework and setup for testing rules using Deno or Jest.
- A sample
fensak.ymlconfiguration file. - A sample GitHub Actions workflow for CI of the rules scripts.
Try running the tests with deno test or pnpm test (note the required flags in the README.md!), or look at the
sample rule file to see what it looks like.
After looking around, you will want to at a minimum update the fensak.yml file. The config in the template repository points
Fensak at a fictional repository called my-repo. Unless you have a repository actually called my-repo, you will need to at least
update the fensak.yml configuration to get started. Be sure to update the reference to an actual repository that is in
your Workspace. Be sure to make the change on main, through a pull request!
IMPORTANT
Don’t forget to protect the default branch with branch permissions on the
.fensakrepo!Treat your auto-approval rules like admin privileges. Access to modify the auto-approval rules means a user has arbitrary access to bypass protected branches in target repositories! You should guard this repository by following best practices:
- Limit the teams that have write access to the repository.
- Enable traditional protected branches. DO NOT enable Fensak on this repo!
Create a test PR that passes and fails the sample rule
Once your .fensak repository is setup, you can start using Fensak! Fensak will automatically pull in the configuration
and rules from the .fensak repository once it starts seeing pull requests in your Workspace.
To see how Fensak monitors your pull requests, go to the repository that you configured in the fensak.yml file and
open a PR. We recommend creating two PRs, one with only a change to the README.md file and one that modifies another
file.
When you open a PR with a configured rule, Fensak will automatically create a check against the PR. The check contains the results of running the rule against the change set, as well as an evaluation of the number of approvals on the PR.
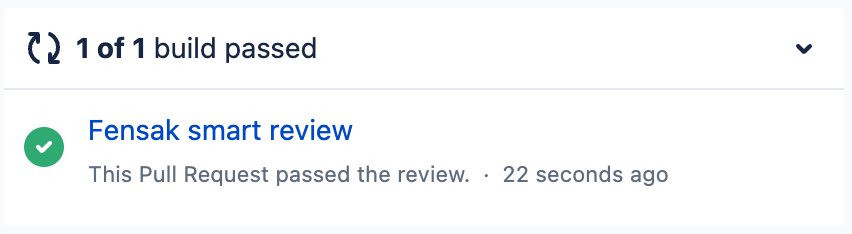
You should see the check pass on the PR containing only the change to the README.md file, while the check should fail
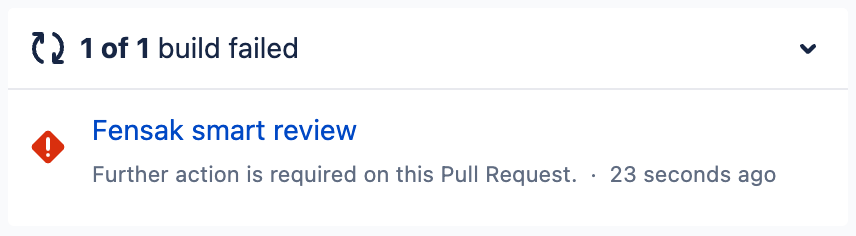
on the other PR since it will not have any reviews.
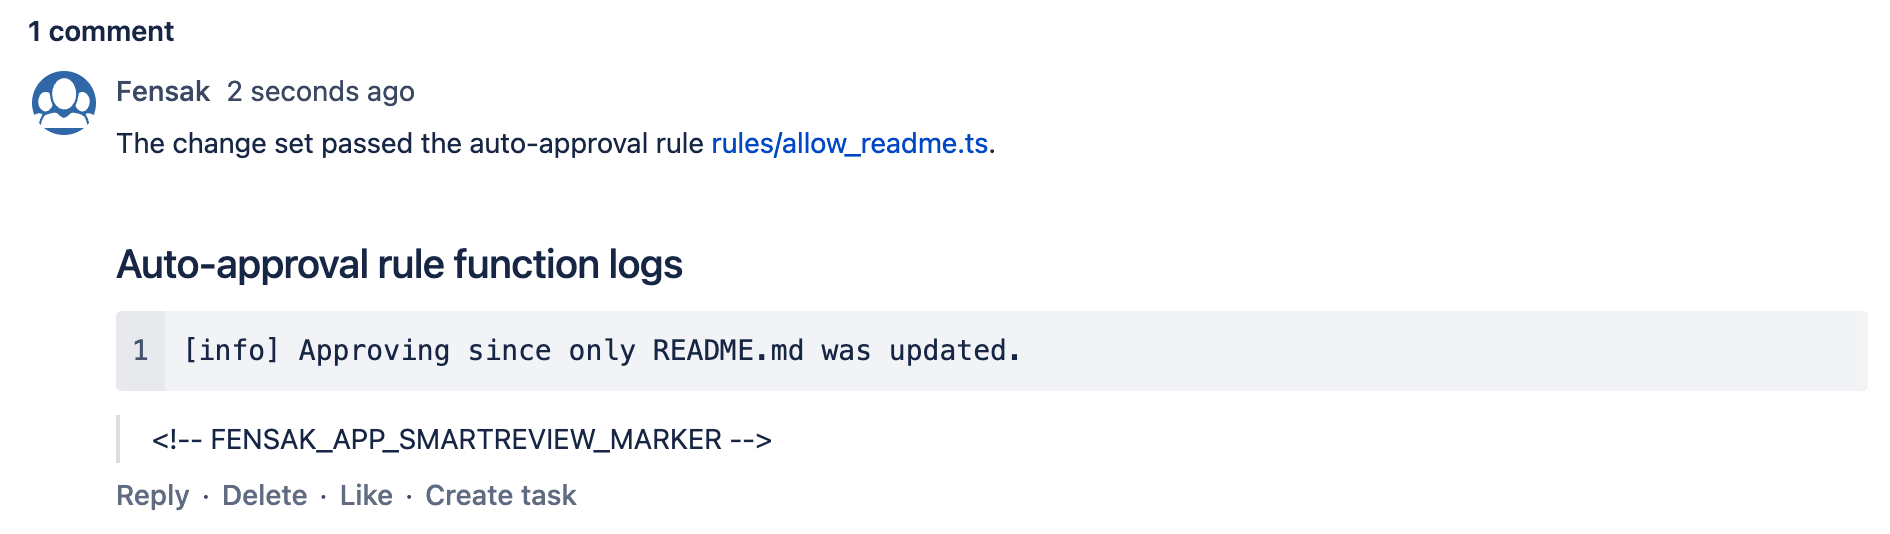
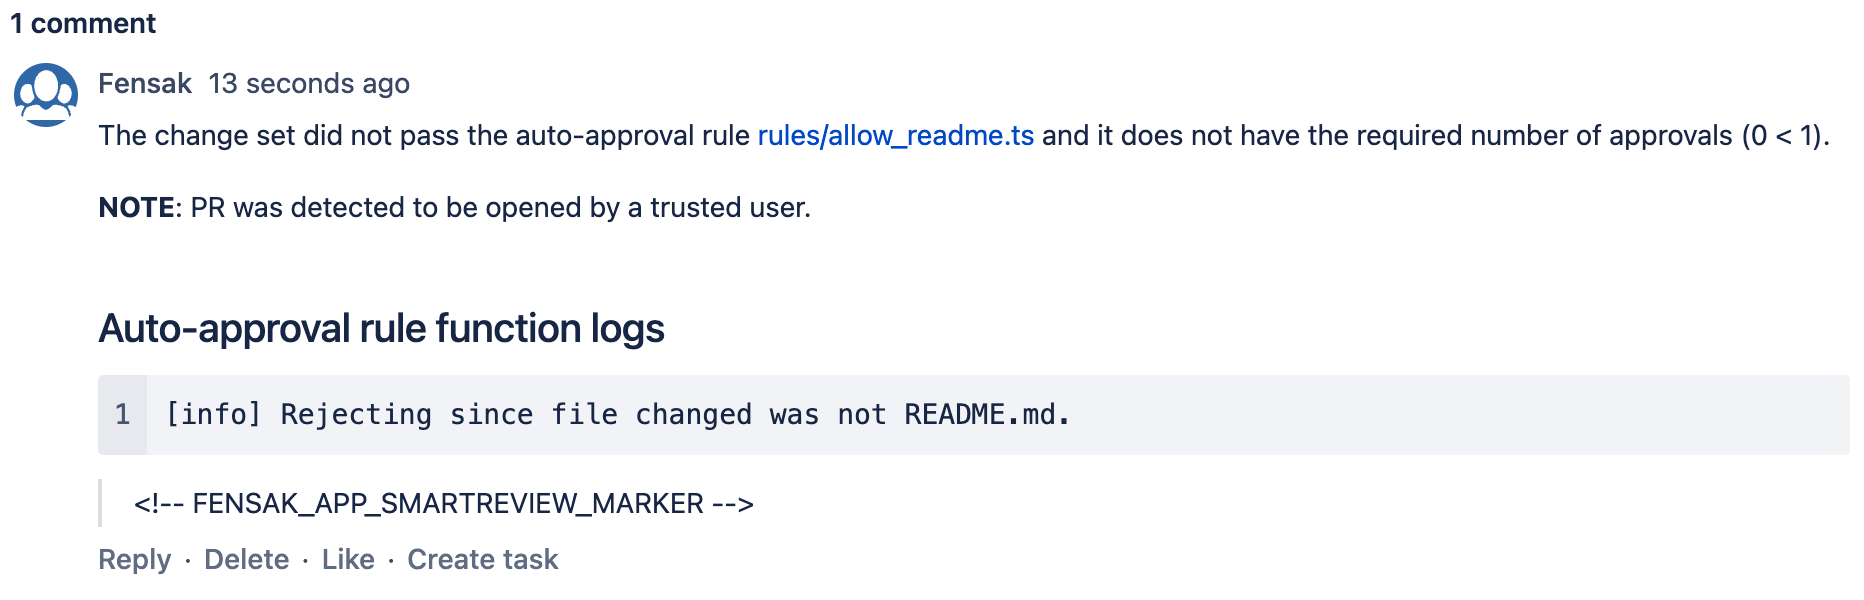
Fensak will report information about the check as a comment on the PR. The comment will contain details like the reason for a particular result, as well as any runtime console logs that are reported from the rules.
Here is an example of what it looks like for an auto approval:
Build Result
Comment with details
And here is an example of what a failed check looks like:
Build Result
Comment with details
On the failed PR, ask a coworker to submit an approval. A new Fensak check should be automatically triggered, and this time the check should pass.
Note that at this point these checks are purely informational. To actually enforce protected branches, you also need to set up branch permissions on the repository to take advantage of the Fensak status check to block PRs when it fails. In the next section, we will guide you through setting up the rules on the monitored repos so that the checks are enforced.
Configure branch permissions on the monitored repo
Fensak by itself does not implement protected branches. It still relies on the BitBucket native branch permissions to actually enforce the rules. However, your branch permission rules can be minimal with Fensak as most of the rules are pushed to the Fensak service.
To enforce the Fensak check, create a branch permission that requires merge checks for your trunk branch (typically
main or master). Refer to the official BitBucket
documentation
for information on how to do that.
NOTE
You must be on a BitBucket Cloud Premium plan to implement merge checks.
You should turn on the rule Minimum number of successful builds for the last commit with no failed builds and no in progress builds to ensure that the Fensak check must pass. The minimum can be set to 1.
With these settings, your repository is now protected with Fensak, while allowing some trivial routine changes automatically.
However, there is one more step missing to allow automated Continuous Delivery: enabling auto-merge on the PR.
Enable auto-merge on the repo
With the protected branch settings and Fensak rules, you have a framework for allowing changes to go through without review. However, the current setup is fairly limiting for Continuous Delivery since the bot that is creating the auto-deploy commit will need to wait for Fensak before it can merge the PR.
To avoid this synchronization step, you can enable automatic merge throught the merge check settings. With auto-merge, the bot can stage the PR to automatically merge at the moment all necessary merge checks for protected branches pass. This means that it no longer needs to wait for Fensak, and the PR can automatically merge as soon as the Fensak check passes.
To allow PRs to be auto-merged, you must first allow auto-merge in the repository settings. This should be under the
branch restriction settings, as a checkbox labeled Allow automatic merge when builds pass.
To implement Continuous Delivery workflows in this model, update your config changing bot to do the following using the BitBucket APIs:
- Make the change that should be auto-deployed to the infrastructure code.
- Create a branch, commit the change, and open a PR against trunk containing the change.
- Update the PR to auto-merge once checks pass.
And that’s it! Fensak and BitBucket should take care of the rest, provided there are no merge conflicts blocking the PR from being merged.
Where to go from here
Congratulations! You just configured your first auto-approve rule using Fensak and walked through the steps end-to-end on how to use Fensak for protecting your branches with Continuous Delivery.
From here, you should update your Fensak config to unlink the repository from the sample rule (unless you want to auto-deploy README updates), and start defining custom rules that meet your needs.
For an overview of how to write custom rules, refer to our Writing rules scripts guide.
For an overview of other Fensak configuration options, refer to our Config file reference.
If you need help, have additional questions, or any feedback for the service in general, head over to our GitHub Discussions forum.